The Impala Tutorial
The Raw
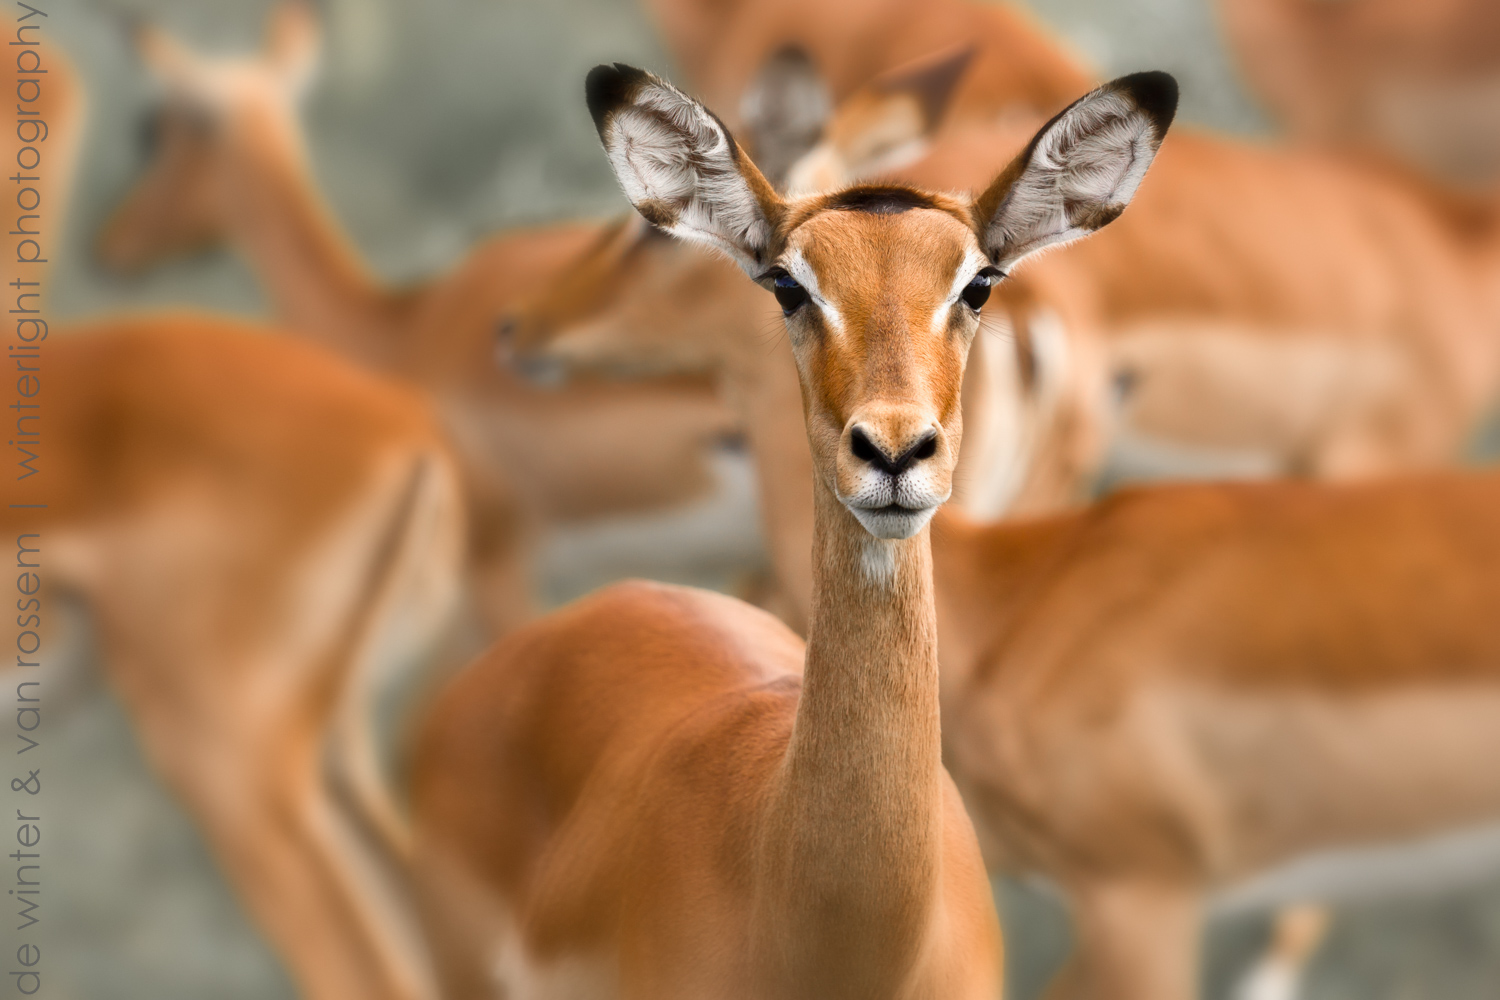
This photograph was made in March a couple of years ago in the Kwando-Linyanti region in northern Botswana just east of the Okavango, a rather remote and wild reserve with lots of game. This shot was totally unplanned, but resulted from a pop up opportunity along the way. Out on a game drive actually in search for African wild dogs - which by the way we were not able to track down that day - we encountered this herd of impala near the end of the afternoon. We were driving westwards in an open jeep, it was around 4.30 pm and the light was already going down a bit.
As you can see the impala who was on the left side of the vehicle, is nicely side lighted from the right. As this area is more remote, the game is rather skittish because they are not that used to vehicles as in other more heavily visited regions.
So they tend to stop, stare for a moment and then run off. It is only a few seconds that they will stand still like this with that typical inquisitive look in their beautiful dark brown eyes with long lashes and both ears standing up and rotated to the front. In the back the rest of the herd is already moving in the opposite direction.
We wanted to portray the impala as a headshot, so the texture and hairs of the skin, the ears, the eyes and lashes would be clearly visible and crisp. But we also wanted the head of the impala to stand out from the background movements of its colleague impalas. At a focal length of 200 mm, an aperture of f/4 was used to preserve a shallow depth of field. This aperture also gave us enough light to be able to use a high enough shutter speed of 1/1000s to freeze all movement, and at the same time keeping the ISO as low as 200 for good image quality and low noise.
The Post
At the time the image was post processed, we still used Lightroom 3 (steps 1- 6) and Nik Software (now Google) plug-in for Lightroom for step 7.
Global adjustments:
1) First the white balance was adjusted since in the field there had been no time to make a custom white balance, so auto white balance had been used while shooting. This had resulted in an image with a predominantly bluish cast. So in Lightroom the temperature slider was moved to the right from 4950 to 5500, giving it a more agreeable and warm atmosphere.
2) As the image looked still a bit bland, a 0.5 stop of exposure was added by moving the exposure slider a bit to the right.
3) Some local contrast was added to the whole image by sliding the clarity slider up to +40, and a little color boost by moving the vibrance slider to +10. Clarity and vibrance were used instead of the contrast and saturation sliders, because at that time clarity and vibrance in Lightroom were designed to go softer and more delicate on the saturation, resulting in a more natural look and feel.
4) To further enhance the contrast, the point curve "medium contrast" was selected in the tone curve tab.
5) Just a little sharpening was used with an amount of 25, radius 1.0and detail 25, leaving lots of room to sharpen further in the process depending on the output and final purpose and use of the image. .
Local adjustments:
6) Except for the open space between the different animals filled with green grass, the image had a uniform warm color tone of mostly orange, brownish grey, and an little black and white in the face and ears of the animal. So it was decided to desaturate the green grass in the upper left corner, because it lead away the eye of the viewer from the subject. In the HSL tab of Lightroom therefore the green saturation slider was pulled all the way back to the left to -100, and also the yellow saturation slider was moved to the left to -70. This did the trick, and all open spaces between the animals now had a grayish brown tone, which was not disturbing to the eye any longer.
7) To enhance the already shallow depth of field a bit further, a Nik Software plug-in ColorEfexPro was used to add a little bit of extra blurring in the four corners of the image.
This software uses so called U-point technology for selective editing. The tool lets you select an area of your choice, and with vignette blurring selective tool, it is possible to adjust each area you select separately to your taste and liking by moving the slider left or right.
The result is an environmental portrait of one impala singled out of the herd in the background. We like the image because it is a nice representation of the living circumstances of plains game for instance in this case the impala.
The Tips:
A) When photographing animals moving in a group, it can be difficult to find a good composition, as they understandably can not be directed. A portrait of one animal is nice, but then the feeling of the group is lost. Try to concentrate on one individual, use low aperture for shallow depth of field, so the other animal's silhouettes are still visible but blurred in the background, so the focus stays on your subject.
B) As for people's portraits, it is a prerequisite that the eye of the animal is in focus, so choose your focal point carefully and be sure it is aimed well at the eyes. With shallow depth of field of course the nose can be slightly out of focus, but that is always less disturbing than the other way around.
C) In photographing portraits of moving animals be careful to use a shutter speed high enough to freeze the movement and retain sharpness. When there is not enough light, it is better to dial up the ISO because noise - if necessary - can be dealt with in post with good noise reduction software. An unsharp image due to motion blur on the other hand is usually beyond repair.
D) To direct the eye of the viewer in a natural way to the subject it is possible to use selective blurring as a sort of vignette blur in post-processing on top of shallow depth of field resulting from large aperture. If used sparsely, natural look and feel of the image is preserved.